There are few desserts as time-warp and as classy as the good Barbadian butter cookies. Their creamy buttery goodness and their tender body in the mouth have won them places in households everywhere with those famous blue boxes. What, however, makes them extra special? Is it the exquisite relationship between the constituent parts, the methods of preparation, or is it simply the nature of the ingredients? In this article we shall go all around the world and bring you the best Danish butter cookies there’s for you to make and enjoy. If your intention is to rediscover great experiences or just learn how to bake with antiquity these are the instructions you require in order to basically learn to make such famous cookies without buying them.
Introduction to Danish Butter Cookies
What are Danish Butter Cookies?
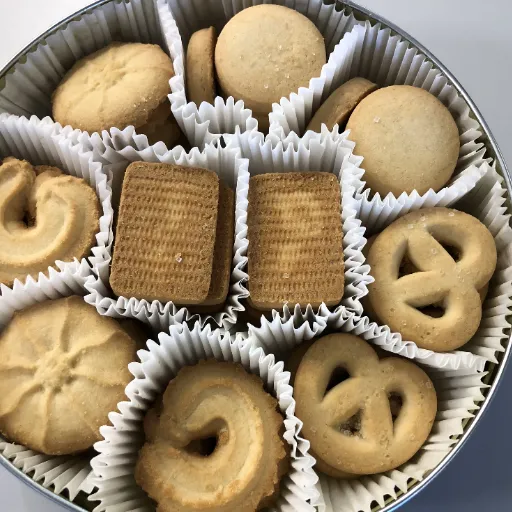
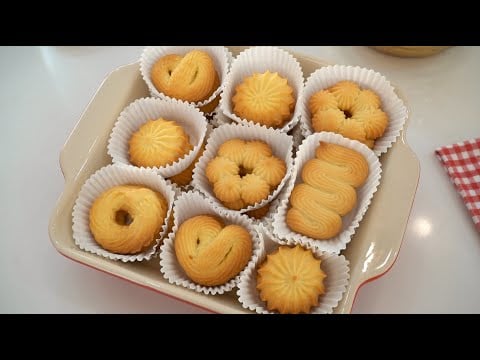
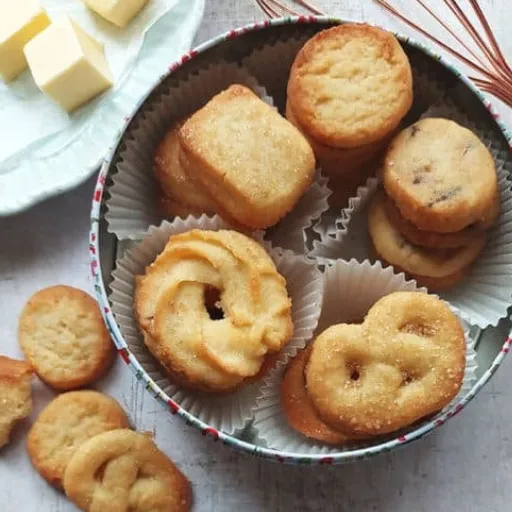
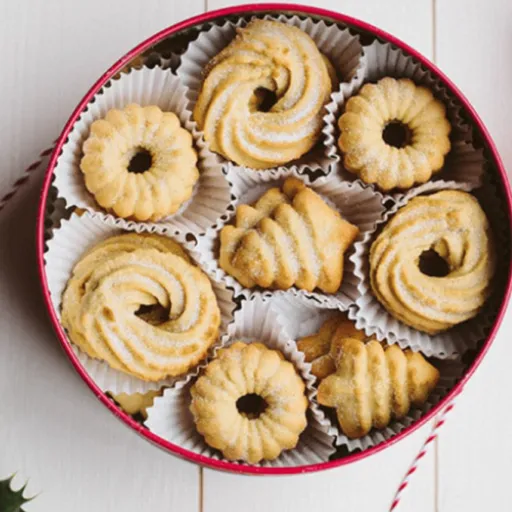
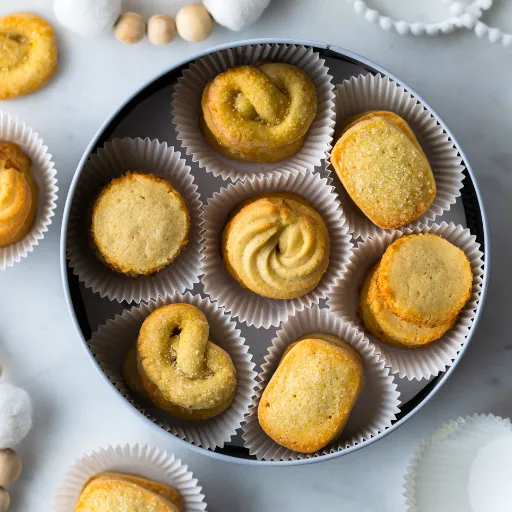
Danish butter cookies are a quintessential dessert of Danish origin, known best for their vibrant butter taste and a brittle, crumbly feel. In preparation for the cookies, four basic ingredients including unsalted butter, sugar, flour and sometimes vanilla or salt for better taste are utilized most times. The piping technique may also involve various shape patterns to make rings, pretzels, or circles before baking; those patterns are as trendy as their shape.
The fine butter used in the making of Danish butter cookies is supremely important other ingredients. It is this ingredient that both gives the ultimate flavor, and softens the texture of the cookies. All known traditional versions stress the need to use non-salted real butter for the proper enrichment and dissolving sensation which makes the cookies why they are what they are. A regulated baking environment that allows for this light brown color does not mean that the batter is excessively cooked as the airy texture is protected.
The image of tins is usually Christmas, weddings, and other situations where all the family members are present. Yet the décor of these tins is such as to excite any gift recipient, and in most parts of the world, these cookies are extremely popular. It is in this elemental factor of maintaining the purity of the ingredients and the perfect simplicity of the recipe that the Danish butter cookies have remained intact as the exceptional treat devoid of age limits.
The History of Butter Cookies in Denmark
Sweet biscuit known to most people in Denmark as “småkager” – butter cookies – is inextricably linked to the culture and fine Danish cuisine. Even as early as the eighteenth century, it is possible to detect the first attempts to bake such biscuits as butter was an inevitable product for the Danish woman of that time because of the developed dairy industry in the country. Additionally, such cookies owe much to the quality of Danish butter which was exceptionally thick creamy and therefore tasty. Throughout the years, the method was experimented and reduced to a few steps involving the use of only the best of ingredients – butter, sugar, and flour.
These biscuits, however, were not always affordable and their popularity has risen within the 19th and early 20th centuries when there were improvements in food technology that a better consistency in baking process was possible. Danish bakers also utilized the preparation of butter cookies not only they were to be devoured locally but also were to be exported and their delicious and superior quality were to up the exports. Tin containers, made available in the mid-20th century for purposes of decorative and stylish packaging, contributed to the growing awareness of the confectionary product across the regions for its ‘intrinsic gastronomic pleasures’ and ‘giftable surfaces’.
Danish butter cookies is definitive of what baking in Denmark represents and cherished as a form of art as well as a token of hospitality. It is not restricted to this country, rather it has become a caricature around the world owing to the likes of Royal Dansk and Kjeldsen’s among many other brands. What makes Danish butter cookies one of the most long-lasting treats is also its simplistic appeal and desire for it that bursts through generations, unconcerned with socio-geography.
Why Royal Dansk is Famous for Butter Cookies
Royal Dansk remains successful in the production of butter cookies because of how it combines some fine ingredients, long-time recipes, and ordinary tinker’s skills which leave no space for questions about quality. Since its inception in 1966, the company has promoted the use of ingredients such as real butter and high-quality flour for the manufacture of the cookies used. This has helped Royal Dansk cookies to develop and maintain a unique and appetizing taste as well as a unique texture which cannot be matched by others.
And, of course, the famous and so-called blue tin design is another major component of Royal Dansk success. The cookies remain fresh inside these tins and the tins themselves are one of the reasons why the danish butter cookies are remembered. Every detail, starting from construction ending with the artwork depicting a Danish rural house makes this product known and attaches to it the core values of a true Danish made product. Most tins have also become quite practical because they can still be used for their initial purposes even after the biscuits are consumed within them.
Moreover, Royal Dansk has found fame across the world by promoting its danish butter cookies as both an indulgence and an inclusive present. The brand’s reach to a wider audience, without compromising the quality of its goods, has helped it maintain a stable following. By retaining its authenticity and promoting the principles embedded in its culture, Royal Dansk stands for Danish gastronomy and is still one of the most popular brands associated with butter cookies.
Ingredients for the Best Danish Butter Cookies
Essential Ingredients for Authentic Taste
Danes have managed to craft a unique distinguishable product called Danish butter cookies, which stands out for its simple but equally high-quality ingredients. Each of the components help does its part in ensuring the specific taste and texture these cookies are famous for is achieved. So, listed below are the necessary ingredients to wake up a good cookie:
- Robust Butter Without Salt: This is a high level important ingredient that cannot be omitted as high-fat butter makes the cookies richer with softer texture that seems to dissolve in one’s mouth. Proper at-home, handmade baking includes finding, soft butter and if printed butter cookies had generic and low fat of metropolitan style butter.
- Multipurpose Flour: Multipurpose flour, which is finely milled provides the necessary structure to the dough and still maintains the soft texture of the cookie. Proper measurement of flour is very important so as not to make cookies dense or crumb like.
- Castor Sugar: The granulated sugar allows these cookies to reach a perfect degree of sweetness. Furthermore, every bite has a little crunch due to its effect in combination with other ingredients.
- Precious Vanilla Flavoring: It can only be supplemented with clean, fresh vanilla. This is efficient and practical. Use of imitations is discouraged because the taste may be altered to be more deceitful.
- Salt (optional): A springle of salt is an important addition as it brings more depth to the sweetness in the dough and works without being intrusive.
All of these ingredients when used in adequate proportions help in making sure the cookies maintain the danish butter cookies heritage while being of good culinary quality. Balancing these aspects in terms of quantity and quality is a cryptic art which makes any Dane styled as Royal or any other butter cookies.
Variations in Ingredients for Different Flavors
Modifying the base method of producing danish butter cookies makes it possible to explore other flavors in the cookies without changing the basic smoothness and richness that we are familiar with. In order to come up with a chocolate version, some good quality cocoa can be added into the mixture in such a way that all bits of the dough effectively take up the color leading to a solid taste without modifying any other characteristic of the cookie. In the same way, when grated lemon or orange peels are added to this cookie, it does so in a lovely manner with its zesty touch.
In nutty preparations, nuts like almonds or hazelnuts, finely chopped or milled, may be added to the composition to provide light crispness and a nutty smell. Variations that included vanilla may contain either vanilla bean paste or essence so as to enhance the aroma of the cookie without overpowering its sweetness. Also, spices that include cinnamon or cardamom can also be mixed for added warmth, which is most suitable for holidays or any special occasions.
Following these recipes incorporates the stability of elements because the recipe is the base. Because of the flavor and the texture of the cookie, addition of the ingredients should be within the recommended measurements. This way, the re-production of the original concept will be subject to benevolent modification of the recipe if more ingredients are needed.
Choosing Quality Butter for Optimal Results
Chefs often include butter in danish butter cookies preparation since butter aids in forming the expected consistency of premium cookies. In terms of ingredients, butter is one of the core ingredients that plays an important role and thus affects the selection of this particular ingredient. The smoothness and creaminess desired in the recipe is reached by this percentage, that is why unsalted butter is highly sought after. For a better Buyer, so that the desired taste is not out even a bit, it is best to use unsilled butter.
One cannot assess butter quality without looking at the methods of how it is obtained and processed. There are various variations of butters and among them, European styled ones are quite common because they have more fat content and less water compared to normal styles. This provides a more pleasant feeling in the mouth and less changes in the dough structure. In this regard, butter from Grass-fed cows has mild grassy tastes, deep flavor and is more nutritious due to higher quantities of beta-carotene and omega-3 fatty acids. Such factors as organic or pasture-raised label certification would also guarantee freshness and best management practices requirements.
Proper understanding of storage techniques and management for butter actually also supports the better functioning of the end product. Freshly extracted butter when bought must be refrigerated, preferably below room temperature, not exceeding 35 degrees F (1.6 degrees C) in order to help maintain the taste and color without oxidizing the product. If necessary, however, frozen storage of refrigerated butter significantly extends the storage period and the baked goods remain equally tasty, elastic and free of any crispiness even when folded at the freezer’s temperature. In addition, bakes perfectly spreadable butter when soft enough and its surface is put together with other components, which helps to emulsify everything perfectly and bake proper round cookies with appropriate crumb. The following concepts help bakers to produce with confidence and expertise the best-danish butter cookies color and also appearance.
Step-by-Step Danish Butter Cookies Recipe

Preparing the Dough
When you prepare dough for danish butter cookies, it is important to measure and temper all the ingredients properly. First, allow the unsalted butter to soften to room temperature to achieve the right consistency – soft but not runny. Accurately measure the ingredients such as butter, sugar and flour with the help of a digital food scale, because variations in these quantities can ruin the cookies. As far as sweetness is concerned, it is best to use granulated sugar while high quality all purpose flour will help create the desired texture of the cookies. Alternatively, a few drops of vanilla may be inserted or some fine citrus peel grated into the dough for aroma purposes as well, but not to compete with the richness of the butter.
With a stand mixer or a hand held ones with paddle attachment blade, mix the room temperature butter and the sugar until they are fluffy and pale. Incorporating air is an essential step which ensures the structure becoming light and tender. Use a medium speed while mixing to evenly distribute the elements without overheating the butter. Once the mixture is fluffy and pale, a slow speed is used in the mixer as the sifted flour is added in portions. It facilitates equal spreading of the dry components in the mixture without using the dough too much, otherwise, the result will be non crispy danish butter cookies. Once the flour is incorporated, do not continue to beat the mixture; rather, wait for the dough to turn into a mass.
Finally, you have to turn out the dough onto a flour dusted surface or directly into a piping bag depending on the cut-out shape of the cookie. Where rolling and cutting shapes is the option, refrigerate the dough folded in the cling film for half an hour to aid in manageability and prevent softening at room temperature. It is also important to note that piped cookies must be kept in the dough with such consistency that shapes are still formed in sufficient detail. Preparing the dough correctly not only aids in achieving a perfect bake, but is also where the distinct taste and texture of the danish butter cookies comes from.
Baking Techniques for Perfect Cookies
Baking the perfect cookie takes effort, one has to be a perfectionist in order to bake a flawless cookie. The first step is preheating for consistency even before putting the trays in the ‘consistency baking’ so as not to experience ‘uneven’ cooking. Since Danish butter cookies are baked at about 350°F (Rich 2005 175°F) apart from the normal baking, alterations may be made if the cookies are either thick or there is another product in the recipe.
Mind the position of the cookie sheets in the oven. They should be in the center for better air circulation unless in case of great quantities of trays in the oven, all trays must be rotated after half of the baking period as the oven warms differently in each part of the cavity. The use of parchment paper or silicon mats does not only help avoid sticking on the tray but also helps with providing a uniform surface which assists in the even browning of the get more coverage.
You should sometimes keep an eye on the baking time as the thickness of the dough or the ratio of the ingredients or even the amount of air moisture may cause some changes. The usual baking time is from 10 to 15 minutes and when the edges of the cookies become a little brown while the center still stays whitish, they must be taken out. No less critical is cooling, the cookies should be immediately placed on the wire rack instead of being left on the hot pan lest they become dry as happens to danish butter cookies which easily soften. Using such methods allows bakers to make batches which get comments of how tasty, nice looking and has the perfect texture.
Cooling and Storing Your Cookies
Effective strategies for cooling are crucial in containing the risk of drying/snense of softness in cookies while also preserving its crave for a crust. When Cookies are made, extracted from the oven, it is imperative that they rest on the baking tray for around 2 minutes. This duration is enough to allow sufficient carry over cooking where there is no risk of burning the food. Remove the cookies just as they are now mildly stiff by placing them on that wire rack which will facilitate air circulation below the cookies and prevent water from collecting in each of the cookies underside thus making it easy for one to enjoy the crunchy exterior. Failing to adhere to this course of action may compromise the texture where the distinction between soft and crunchy that is associated with danish butter cookies is lost.
Storage requirements are significant in keep cookies fresh for a longer period of time. The air tightness of the container is advised because the presence of air hastens staleness and may diminish the taste. For highly stacked cookies, it is necessary to put parchment paper or wax paper between the cookies to avoid them sticking to each other and for them to retain their structure. It is preferable to store the jar in a cool dry area away from direct light. This helps to protect the cookies from heat which may cause oil to melt or break down and affect the creamy taste and texture of the cookies.
To maintain freshness for a longer period, one may consider using freezing which works well. If one decided to freeze the danish butter cookies, they should be spread on a parchment paper lined tray and set in the freezer for approximately an hour prior to placing them in a stack as this will keep them from sticking one another. When they are hard, pack the cookies again into zip-lock bags and remove the air sucton and seal the bag or place the cookies in an airtight containers. Cookies packed in such a manner and properly stored in the freezer may last for a period of three months. Before serving, they may be kept at the room temperature for few 30 minutes or slightly heated in an oven in order to replenish the freshly-baked smell delicious soft bites. Given the specific instructions for cooling , and the storing procedures provided above, it is clear that the cookies will still be great for eating long after they have been prepared.
Tips for Baking the Perfect Danish Butter Cookies
Common Mistakes to Avoid
- Dough Spinning Drawbacks: Owing to an increase in glute, elongation dough spinning side effects include harsh and torsion results when cooking cookies. In cases of Danish butter cookies that are light and fluffy, one should mix well not all the components. I do not recommend mixing overly quotient especially when flour has been incorporated.
- Using Ingredients at Inappropriate Temperatures: Dough needs to be right under the temperature along with the butter. If the butter is too soft, the dough becomes oily and difficult to pipe, and the cookies may spread excessively during baking. However, butter that is too cold may be difficult to cream with sugar, and the cookies will be dense. Let the butter sit at room temperature, do not allow it to melt though.
- Piping Skills Not Well Developed: In order to make cookies with the same size, good piping skills is a must. The wild issue of uneven pressure or irremissible consistency in piping, for example, comes in when all cookies are of different sizes and texture and consequently, of different baking times. There should be a space in between every movement. All the same, the pressure should be able to create the symmetry of the motion.
- Optimal Oven Setting: It is very easy to make a mistake in setting the oven temperature while baking cookies, though at times it is quite detrimental. It is important to use an oven thermometer because a lot of ovens do not provide the temperature that has been pre-set with precision. Set the thermostat properly to bake the cookies in the recommended temperature range which is at most 350°F (175°C) to enable them to turn golden but not get dried.
- Solving the Problem of Flattening the Dough: Also, no chilling the dough may result in cookies spreading a lot in the oven. In the event that you piped the dough, make sure to refrigerate it for 20 to 30 minutes on the sheet before baking to allow maximum results. The butter hardens and helps in retaining the shapes of the cookies when baked.
- Wrong Storage After Baking Danish Butter Cookies: Even the crispy texture of Danish butter cookies might be in jeopardy if proper storage methods are not practiced. Make sure to let the cookies cool down initially and then store them in an airtight container. A few desiccant packets within the container itself can help in making sure that the cookies remain crisp for quite some time and do not get soggy.
Warding off these errors brings about an understanding of each and every Danish butter cookies’ attributes and qualities, their distinctive texture and taste, and the beautiful presentation which marks every production session.
How to Achieve the Right Texture
Making perfect any danish butter cookies has no other purpose but to observe the simple guidelines relating to the ingredients used and the required skills for it. The first step is using good quality butter containing over 82 percent fat, because it is this very component that gives that unique rich little fluffy taste to the cookies. Allow the butter to ‘warm’ to a room temperature so as to use it easily in the mixture with sugar.
The proportions of the flour in conjunction with the amount of butter placed in also define the texture of the cookies. When there is too much flour the cookies would be dry and heavy while too little flour encourages spreading of the cookies during baking. For best results, all purpose flour that is fine is the type to be used and should be sifted before mixing to the batter if necessary in order to use a smooth batter in preparing the cookies. Further, aside from the flour an addition of cornstarch is used to provide a soft texture to the cookie.
Maintaining the temperature is extremely crucial from the first to the final step of danish butter cookies preparation. Refrigerating the dough before baking makes it tougher and helps to keep the dough from outward expansion, when placed in the oven. Most importantly, the oven needs to reach an adequate temperature before placing the dough to bake at a moderate temperature of about 350°F (175°C) and with even temperature distribution in the oven. Any change in temperature in the oven may cause distorted baked products with, where for instance, the center is underbaked and the edges are too crispy. However, errors due to an inaccurate oven could be minimized with the use of the standard oven thermometer.
Lastly, the dough should not be mixed excessively as that promotes gluten formation, which results in the dough being more chewy. Instead, do not over mix cookies if tender crumb and smooth butter taste in each bite is desired. If these specific procedures are followed, then it is possible to achieve a stable impeccable result each time.
Decorating Your Danish Cookies
Adorning danish butter cookies is beyond adding eye-pleasing designs on the dessert and it is a time to enhance taste profiles. Start working with good effect by choosing a preferred garnish; this can be nuts that had been crushed, sugar granules of different color, or sprinkles that are crafting oriented. If there is a need for a more classical style, one way includes creating patterns with melted chocolate and royalicing. Decorations can be applied with extreme accuracy when certain tools like piping with fine tips or tweezers to chain in tiny pieces come into play.
If you’d like to make your cookies glossy, one way to do it is by applying an egg wash before baking, which results in a wonderful golden finish. If however you wish to include decorative details after baking then perhaps using glazes like lemon or vanilla icings could figuratively speak add sugar on top of your cookies. For example, cookies may be staged with food safe colors that are a part of the glazes to meet numerous themes or occasions. Ready to use edible decorations such as, among others, edible glitter, edible gold/silver leaf or shimmer dust can help to achieve even the most luxurious look suitable for presents and any occasion.
To go further than simply decorating borders, it is a good idea to take into account the visual correlation and textures of taste of the decorations. For example, adding a layer of chocolate syrup laced or dotted with sea salt; adds an invitingly sweet but salty contrast. Likewise, the sharpness of the cookies can easily be mitigated by the sweet, rich flavor of candied orange or lemon peels. Putting cake decorating skills to good use along with different layers of flavoring not only enhances the appearance of the cookies, but makes the eating experience more interesting too.
When the dough has been chilled in the metallic edged container, use the cutter to make the cookies and then transfer the cookies in the flat container using the spatula. The purpose of freezing the dough is to make sure that the outlines of all the shapes cut will not be ruined and in addition, the cut shapes will be easy to peel off. After that, make sure to arrange the cookies on the greased tray evenly with space in between the cookies so that they do not touch each other after baking. Danish butter cookies for example need to be resettled every so often in order to get them out of the oven as heavenly as they were put inside.
Serving Suggestions and Pairings
Best Beverages to Enjoy with Butter Cookies
Normally when you are selecting drinks to go with butter cookies, the aim is to use drinks which will either go gently and sweetly with the cookies or clash with them. Let’s say a hot brewed coffee, hot. This is the classic choice, as it is easy to digest and gets rid of the rich cookies and is bitter. From the same persuasive angle, sporty Earl Grey fills the void with flavors of adventurous and spicy, bergamot.
As for carrying cold drinks, no one will ever forget about milk, which is a traditional drink served with cookies, particularly due to the fact that it complements the cookies’ softness and eases the irritation caused by crunchy cookies. On the other hand, some lemonades are lightly or even not at all sweetened and some carbonation is sometimes all that is needed for a break from the nourishment of danish butter cookies.
Furthermore, wines such as Moscato and late harvest Rieslings that are known as dessert wines enhance the richness of the taste since they are sweet, hence, the cookies’ oily nature is not seen as a turn-off but an advantage. In the case of alcohol, it is advisable sail this steamer’s for a boiling chocolate with a hint of cinnamon as a luxurious, heavy creamy drink to contain the plain cookies.
Presentation Ideas for Special Occasions
People enjoy doing special things when they present cookies. If it is a special occasion, their creative skills can help them transform plain cookies into a beautiful centerpiece. One or even more layers of different shaped cookies on the serving trays are really helpful since they don’t only look greater by providing height but do justice to the limited table space. For a more contemporary look, such finishes may be moved into trays of a single colour or even those with bases of gold or silver which complements the colour scheme of the celebration. Use of edible flowers, any fresh herbs like rosemary leaves or sprigs or even little ornaments pertinent to the event may be added for even better presentation.
There is a whole new experience that comes with wedding favors or party favors for birthday or corporate events done individually. This can easily be done by eco-friendly carrying boxes made of kraft paper and sashed with ribbon or twine for a rustic look. Clear cellophane bags with labels and/or tags with simple written notes can go a long way in making the products professional. Sometimes, it is possible to write those tags in such a manner that some information about the flavor of the cookie or some special ingredients is included.
It could create an intense positive visual engagement especially at larger events if the concept of a thematic dessert table is carried out. For instance, present cookies with macarons, chocolates, or even small pastries in similar shades of color. Use trendy LED lights or frames to enhance the decor, so it can be distinct in evening functions. Food allergen labels and ingredients are a good addition to the setup, as they show some forethought in the health and well-being of the guests. That’s why all these things and more come into rea lizing how the simple thing such as cookies can work as art and entertainment, as opposed to just plain danish butter cookies.
Storing and Gifting Your Danish Butter Cookies
Whether it is the freshness or the distinctive taste of danish butter cookies, proper packing plays an important role in storing them. Ideally, these cookies must be stored in a sealed container in order to contain any moisture or air that may make them go stale. It should also be kept in a place that is not hot or humid, due to the fact that heat will cause the butter to melt thereby ruining the texture and taste of the cookies. For long-term preservation of Danish cookies, freezing them is recommended, however, before doing so, the cookies should be wrapped in wax paper and put in a freezer bag made of plastic so that their condition and taste can be preserved for not more than three months. They need to be thawed in room temperature to avoid affecting their consistency.
There are a few more details to consider when it comes to giving Danish butter cookies as presents. The formatting butterfly is also essential, especially when it just so happens to be a beautifully colored high-quality tin or box. So as to enhance the delivery, some paper such as parchment paper can be used between the layers of the cookies which ensures that all do not become glued together. Writing a note specific to the receiver, or adding a ribbon to a container may also help make presentations of gifts more unique and appealing. Such packaging ensures that the gift is well appreciated and not biased at all.
If you plan to follow recipient’s food preferences and gift them some food product, it is best to include a list of ingredients on the card of the gift. It is useful as some people might be allergic or maintain a strict diet. In addition, it is an advantage to use degradable materials for the packaging, complementing the general cause of sustainability and enhancing the enjoyment of the gift. With the help of such appropriate storage techniques and gift presentation approaches, Danish butter cookies will remain scrumptious, impressive and memorable to all the institutions.
References
-
What’s Cooking Recipe Book
This document provides traditional recipes, including methods for baking cookies. - Click here to read more.
Frequently Asked Questions (FAQ)
Q: What is the description of Danish butter cookies and how do they taste?
A: One traditional variation of Danish butter cookies uses butter and sugar to give a deliciously smooth and buttery texture that improves one’s sweet tooth irresistibly. Certain types of these cookies also feature vanilla flavoring in some cases as most of these biscuits brown edges lightly. Similar-looking containers — the blue one, sometimes called blue containers due to the popularity of the royal dansk danish butter cookies or the classic blue containers. —made swirl looking, Norwegian star-shaped cookies more famous.
Q: What are the essential ingredients for making Danish butter cookies from scratch?
A: When preparing Danish butter cookies, generally one begins with butter and sugar or maybe even powdered sugar in certain recipes so as to add the flour i,e. all-purpose flour even, one egg (egg if one needs to) and a delivery of vanilla extract. Also, It is an alternative but perhaps unlikely solution including coconut and other such items. Whereacies require you to either “lighten and fluffy” or butter and sugar first then beat in the rest of the recipe.
Q: How do you make danish butter cookies in general?
A: At a high altitude the cooking time must be increased (reduce the initial temperature and double the time). Afterwards, when the cookie dough has been prepared and whipped, transfer about a third of the dough into a cloth bag that has a regular star nozzle or an open star nozzle attached and squeeze. Lines of cookies should be piped onto “line baking sheets or silicone sheets”. Cookies can be decorated with icing tips or baked after a nozzle equipped with thickening bag pipe swirls or slots. These are placed into an oven that has been prepared at 172 c for normal cooking duration that is approximately 16 minutes.
Q: Am I able to help myself with a/c or a bag on these and which tips would most comfortable for over halves of the fleeca armored?
A: Yes. Shapes are even with a cookie press, piping bags with open stars or offset stars are best for creating ruffles. Miniature piping tips can be used for very intricate designs. Make sure that the star-tipped bag you’re using is being pipped directly onto parchment lined sheets or baking sheets.
Q: How does one bake and refrigerate cookies for baking to ensure the correct texture?
A: Preheat the oven and bake with parchment paper or a silicon mat under the cookie sheet. Take the cookies out of the oven when the edges are light in colour. Cool the cookies on a flat rack in order not to get a damp texture. If your oven tends to cook unevenly, turning the baking tray is advisable for even cooking.
Q: How to properly pack the baked Danish butter cookies and for how long is it possible to keep them?
A: To maintain the crispiness of baked Danish butter cookies, place them in a sealable jar and store at room temperature, or alternate parchment paper to avoid them from sticking to each other. Depending on the way they are stored, they can last up to weeks: store bought ones in the classic blue canister can lasts much longer.
Q: Are there possible changes or modifications to the original recipe?
A: Yes, there are some variations such as inclusion of coconut for an additional bite, addition of sugar crystals for sparkle and incorporating castor sugar in the dough. More vanilla essence can also be added and the shapes to be piped out can be varied using different piping nozzles provided. There is a certain cookie press that some people occasionally use which makes very nice cookie patterns resembling those of a royal dansk danish butter cookies.
Q: I don’t know what I did wrong — my cookies spread too much or were very dense. What should I ascertain?
A: In the case of spreading cookies, be sure you have creamed the butter with the sugar properly — whip the butter and sugar until almost white but not melted; have the cookie batter chill for a couple minutes after it has been piped or return it to the refrigerator. Flash bake them if they turn out to be dense, making sure not to ‘mash’ the flour into the dough after you have floored it out and of all things, do not put in any extra fluid, when the egg is added. Use parchment paper to line the baking pan and keep a close eye on the oven; the cookies should be lightly brown but not dark brown to have a soft crumb.